Starting an automatic filling station search
Requirement:
The automatic filling station search is activated
 More.
More.
Driving situation
Route guidance is active. The fuel level in the fuel tank reaches the reserve fuel level.
The Fuel tank reserve level Do you want to start the search for filling stations? message is shown.
Select Yes.
The automatic filling station search begins. The available filling stations along the route or in the vicinity of the vehicle's current position are displayed.
Select the filling station.
The address of the filling station is displayed.
Method 1: if route guidance is not active, select Start route guidance.
The selected filling station is set as the destination. Route guidance begins.
Method 2: if route guidance is active, select Start new route guidance or Set as next intermediate destination.
Start new route guidance: the selected filling station is set as a new destination. The previous destinations and intermediate destinations are deleted. Route guidance to the filling station begins.
Set as next intermediate destination: the selected filling station is set as the next intermediate destination. Route guidance begins.
If there are already four intermediate destinations:
select Yes in the prompt. The selected filling station is entered into position 1 of the intermediate destinations menu. Intermediate destination 4 is deleted. Route guidance begins.
Information on the location of the fuel filler flap
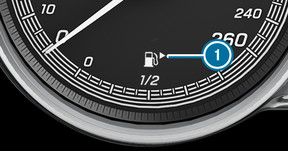
Vehicles with an Instrument Display (standard)
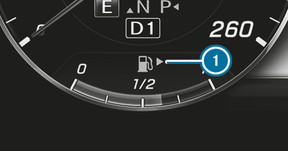
Vehicles with an Instrument Display in the Widescreen Cockpit
The fuel filler flap is unlocked/locked automatically when you unlock/lock the vehicle with the key.
The location of fuel filler flap  is displayed in the instrument cluster. The arrow next to the fuel pump
  indicates the side of the vehicle.
Refuelling the vehicle
WARNING ‑ Risk of fire or explosion caused by fuel
Fuels are highly inflammable.
You must avoid fire, naked flames, creating sparks and smoking.
Before refuelling, switch off the engine and auxiliary heating if your vehicle is equipped with auxiliary heating.
WARNING Risk of injury from fuel
Fuels are poisonous and harmful to your health
Do not swallow fuel or let it come into contact with skin, eyes or clothing.
Do not inhale fuel vapour.
Keep children away from fuel.
If you or other people come into contact with fuel, observe the following:
Immediately rinse fuel off your skin with soap and water.
If fuel comes into contact with your eyes, immediately rinse them thoroughly with clean water. Seek medical attention immediately.
If you swallow fuel, seek medical attention immediately. Do not induce vomiting.
Change immediately out of clothing that has come into contact with fuel.
WARNING Risk of fire and explosion due to electrostatic charge
Electrostatic charge can cause sparks and thereby ignite fuel vapours.
Touch the metal vehicle body before opening the fuel filler cap or touching the pump nozzle.
This discharges any electrostatic charge that may have built up.
WARNING Risk of fire from fuel mixture
Vehicles with a diesel engine:
If you mix diesel fuel with petrol, the flash point of the fuel mixture is lower than that of pure diesel fuel.
While the engine is running, component parts in the exhaust system may overheat without warning.
Never refuel using petrol.
Never mix petrol with diesel fuel.
NOTE Damage caused by the wrong fuel
Fuel that does not conform to the required quality can lead to increased wear as well as damage to the engine and exhaust system.
Only use the fuel recommended.
NOTE Damage caused by the wrong fuel
Vehicles with a petrol engine:
Even small amounts of the wrong fuel could result in damage to the fuel system, the engine and the emission control system.
Only refuel using premium-grade unleaded fuel that conforms to EN 228, or an equivalent specification.
Fuel of this specification may contain up to 10 % ethanol. Your vehicle is suitable for use with E10 fuel.
Do not refuel using:
Diesel
E85, E100
Petrol containing methanol (M15, M30, M85, M100)
Petrol with additives containing metal
If you accidentally refuel with the wrong fuel:
Do not switch the ignition on.
Consult a qualified specialist workshop.
NOTE Damage caused by the wrong fuel
Vehicles with a diesel engine:
Even small amounts of the wrong fuel could result in damage to the fuel system, the engine and the emission control system.
Only refuel using diesel fuel that conforms to European standard EN 590, or an equivalent specification.
Vehicles with diesel particulate filters: in countries outside the EU, only use low-sulphur Euro diesel with a sulphur content of under 50 ppm.
Do not use the following:
Petrol
Marine diesel
Heating oil
Bio-diesel
Vegetable oil
Paraffin
Kerosene
If you accidentally refuel with the wrong fuel:
Do not switch the ignition on.
Consult a qualified specialist workshop.
NOTE Do not use diesel to refuel vehicles with a petrol engine.
If you accidentally refuel with the wrong fuel:
Do not switch on the ignition. Otherwise, fuel can enter the fuel system.
Even small amounts of the wrong fuel could result in damage to the fuel system and the engine. The repair costs are high.
Contact a qualified specialist workshop.
Have the fuel tank and fuel lines drained completely.
NOTE Do not use petrol to refuel vehicles with a diesel engine.
If you accidentally refuel with the wrong fuel:
Do not switch on the ignition. Otherwise, fuel can enter the fuel system.
Even small amounts of the wrong fuel could result in damage to the fuel system and the engine. The repair costs are high.
Contact a qualified specialist workshop.
Have the fuel tank and fuel lines drained completely.
NOTE Damage to the fuel system caused by overfilled fuel tanks.
Only fill the fuel tank until the pump nozzle switches off.
NOTE Fuel may spray out when you remove the fuel pump nozzle.
Only fill the fuel tank until the pump nozzle switches off.
Requirement:
The vehicle must be unlocked.
Do not get into the vehicle again during the refuelling process. Otherwise, electrostatic charge could build up again.
Observe the notes on operating fluids More.
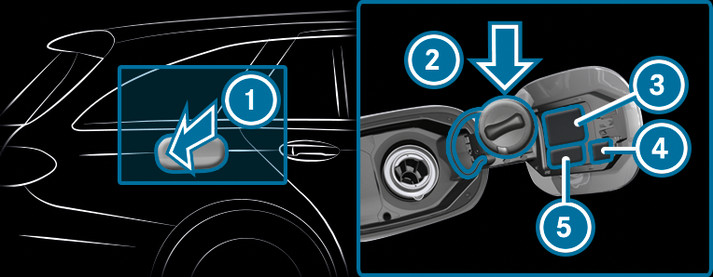


Press fuel filler flap .
. Turn the fuel filler cap anti-clockwise and remove it.
Insert the fuel filler cap into holder .
. Completely insert the fuel pump nozzle into the tank filler neck, hook in place and refuel.
Only fill the fuel tank until the pump nozzle switches off.
Vehicles with a diesel engine: the filler neck is designed for refuelling at diesel filling pumps.
Vehicles with a diesel engine: when the fuel tank is completely empty, refuel with at least 5 litres of diesel.
Resetting values in the Trip menu of the on-board computer
The spelling may differ in the main menu displayed. Therefore, observe the menu overview for the instrument display More.
You can reset the values of the following functions:
Trip distance
Trip computer "From start" and "From reset"
ECO display
To select the function to be reset:
swipe upwards or downwards on the left-hand side of Touch Control. Press the left-hand side of Touch Control.
Select Yes.
Press the left-hand side of Touch Control.
If you press and hold the left-hand side of Touch Control, the function will be reset immediately.
Topping up AdBlue®
NOTE Engine damage due to AdBlue® in the fuel
AdBlue® must not be used to fill the fuel tank.
Only use AdBlue® to fill the AdBlue® tank.
Do not overfill the AdBlue® tank.
NOTE Contamination of the vehicle interior due to AdBlue® leakage
After topping up, carefully close the AdBlue® refill container.
Avoid carrying AdBlue® refill containers permanently in the vehicle.
Requirements:
The vehicle must be unlocked.
The following announcements appear in order in the multifunction display when the AdBlue® tank requires refilling:
Refill AdBlue See Owner's Manual. The AdBlue® reservoir is down to the reserve level.
Refill AdBlue No start in XXX km . You can still drive the vehicle over the distance shown. Top up AdBlue® as soon as possible.
Refill AdBlue Start not possible. The vehicle can no longer be started.
Opening the AdBlue® filler cap
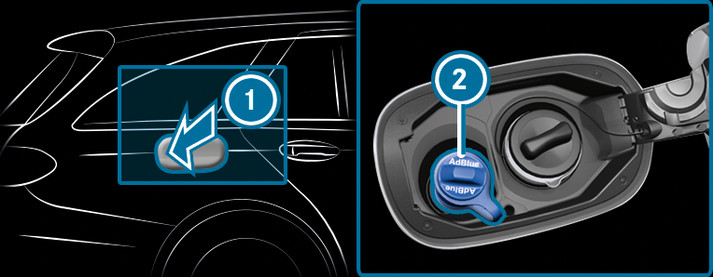
Press fuel filler flap .
. Turn AdBlue® filler cap anti-clockwise and remove it.
anti-clockwise and remove it. Preparing the AdBlue® refill canister
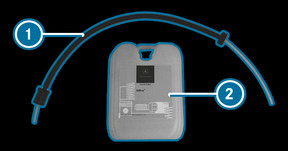
Screw on the fastener of AdBlue® refill canister .
. Screw disposable hose onto the opening of AdBlue® refill canister until finger-tight.
onto the opening of AdBlue® refill canister until finger-tight. Topping up AdBlue®
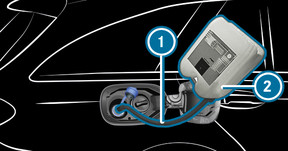
Screw disposable hose onto the filler neck of the vehicle until finger-tight.
onto the filler neck of the vehicle until finger-tight. Lift up and tip AdBlue® refill canister .
. The filling process stops when the AdBlue® tank is completely full.
AdBlue® refill canister can be removed when it has been only partially emptied.
Unscrew and close disposable hose and AdBlue® refill canister in reverse order.
and AdBlue® refill canister in reverse order. Switch on the ignition for at least 60 seconds.
Start the vehicle.
Avoid storing AdBlue® refill containers permanently in the vehicle.
Topping up the windscreen washer system
WARNING Danger of burns from hot component parts in the engine compartment
Certain component parts in the engine compartment may be very hot, e.g. the engine, the radiator and parts of the exhaust system.
Let the engine cool down and only touch the component parts described below:
WARNING Danger of burns when opening the engine bonnet
If you open the engine bonnet when the engine has overheated or during a fire in the engine compartment, you could come into contact with hot gases or other escaping operating fluids.
Before opening the engine bonnet, allow the engine to cool down.
In the event of a fire in the engine compartment, keep the engine bonnet closed and call the fire service.
WARNING ‑ Risk of fire and injury due to windscreen washer concentrate
Windscreen washer concentrate is highly flammable. It could ignite if it comes into contact with hot engine component parts or the exhaust system.
Make sure that no windscreen washer concentrate spills out next to the filler opening.
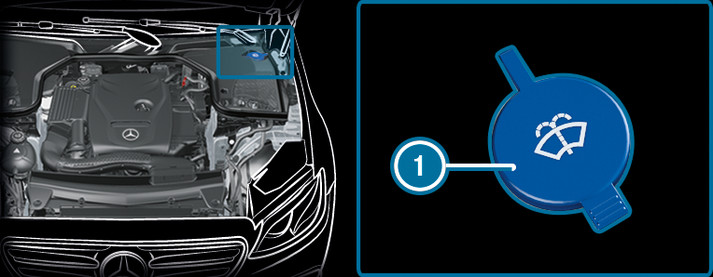
Remove cap by the tab.
by the tab. Top up the washer fluid.
Replacing the windscreen wiper blades
WARNING Risk of becoming trapped if the windscreen wipers are switched on while wiper blades are being replaced
If the windscreen wipers begin to move while you are changing the wiper blades, you can be trapped by the wiper arm.
Always switch off the windscreen wipers and ignition before changing the wiper blades.
Moving the wiper arms to a vertical position
Set the windscreen wipers to the  slow continuous wiping position on the combination switch.
slow continuous wiping position on the combination switch. As soon as the wiper arms are vertical relative to the engine bonnet, switch off the ignition.
Fold the wiper arm away from the windscreen.
Maintenance display
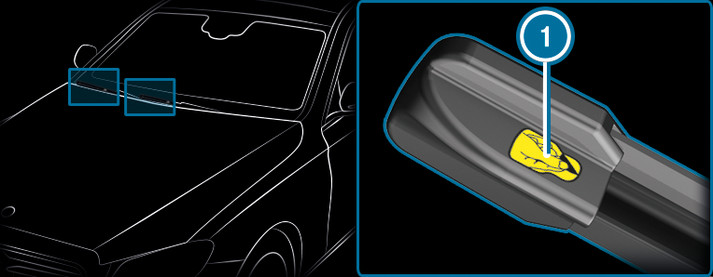
Remove protective film of the maintenance display on the tip of the newly fitted wiper blade.
of the maintenance display on the tip of the newly fitted wiper blade. If the colour of the maintenance display changes from black to yellow, the wiper blades should be replaced.
The duration of the colour change varies depending on the usage conditions.
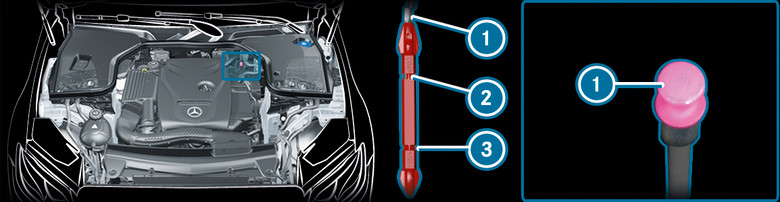
Checking the engine oil level using the oil dipstick
WARNING Danger of burns from hot component parts in the engine compartment
Certain component parts in the engine compartment may be very hot, e.g. the engine, the radiator and parts of the exhaust system.
Let the engine cool down and only touch the component parts described below:
Depending on the engine, the oil dipstick may be installed in the engine compartment in different locations.
Waiting time before checking the oil level:
Engine at normal operating temperature: five minutes.
Engine not at normal operating temperature (e.g. the engine was only started briefly): 30 minutes.
Park the vehicle on a flat surface.
Remove oil dipstick and wipe off.
and wipe off. Slowly slide oil dipstick into the guide tube to the stop, and take it out again after approximately three seconds.
into the guide tube to the stop, and take it out again after approximately three seconds. Oil level is correct: oil level is between
and . Oil level too low: oil level is at
or below. Oil level too high: oil level is above
.
If the oil level is too low, top up with 1 l of engine oil.
If the oil level is too high, drain off excess engine oil. Consult a qualified specialist workshop.
Information on washing the vehicle in a car wash
WARNING Risk of an accident due to reduced braking power after washing the vehicle
Braking efficiency is reduced after washing the vehicle.
After the vehicle has been washed, brake carefully while paying attention to the traffic conditions until braking power has been fully restored.
To avoid damage to your vehicle when using a car wash, ensure the following beforehand:
Active Distance Assist DISTRONIC and the HOLD function are deactivated.
The 360° Camera or the reversing camera is switched off.
The side windows and sliding sunroof are completely closed.
The blower for the ventilation/heating is switched off.
The windscreen wiper switch is in position
 .
. In car washes with a towing mechanism: neutral
 is engaged.
 The key is at a distance of at least 3 m away from the vehicle, otherwise the tailgate could open unintentionally.
If, after the car wash, you remove the wax from the windscreen and wiper rubber, this will prevent smearing and reduce wiper noise.