Attaching a roof luggage rack
WARNING Risk of accident due to exceeding the maximum roof load
The vehicle centre of gravity and the usual driving characteristics as well as the steering and braking characteristics alter.
If you exceed the maximum roof load, the driving characteristics, as well as steering and braking, will be greatly impaired.
Never exceed the maximum roof load and adjust your driving style.
You will find information on the maximum roof load in the "Technical data" section in the printed Owner's Manual.
NOTE Vehicle damage from non-approved roof luggage racks
The vehicle could be damaged by roof luggage racks that have not been tested and approved for Mercedes-Benz.
Use only roof luggage racks tested and approved for Mercedes-Benz.
Depending on the vehicle equipment, ensure that the sliding sunroof can be fully raised when the roof luggage rack is fitted.
Depending on the vehicle equipment, ensure that the boot lid can be fully opened when the roof luggage rack is fitted.
Position the load on the roof luggage rack in such a way that the vehicle will not sustain damage even when it is in motion.
NOTE Damage to the panorama sliding sunroof due to non-approved roof luggage racks
The panorama sliding sunroof may be damaged by the roof luggage rack if you attempt to open it when using a roof luggage rack not tested and approved for Mercedes-Benz.
When a roof luggage rack is fitted, open the panorama sliding sunroof only if this has been tested and approved for Mercedes-Benz.
The panorama sliding sunroof may be raised to allow ventilation of the vehicle interior.
NOTE Damage to the covers
The covers may be damaged and scratched when being opened.
Do not use metallic or hard objects.
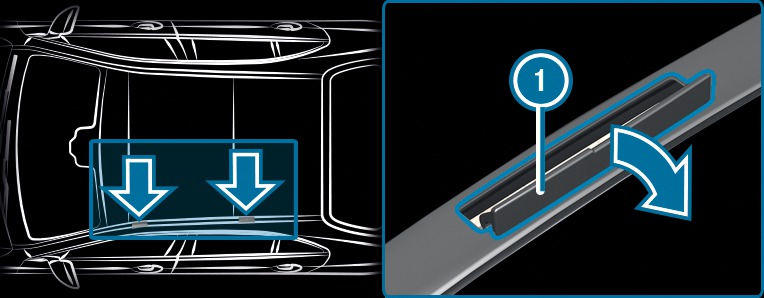
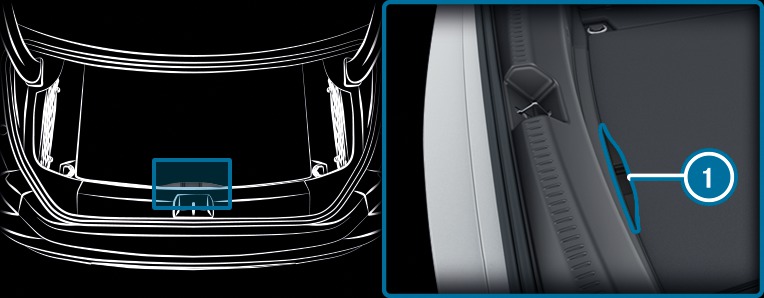
Carefully fold covers  upwards in the direction of the arrow.
upwards in the direction of the arrow. Secure the roof luggage rack to the fastening points beneath covers .
. Comply with the installation instructions of the roof luggage rack manufacturer.
Secure the load on the roof luggage rack.
Folding the rear seat backrest forwards
WARNING Risk of accident if the rear bench seat, rear seat and seat backrest are not engaged
The rear bench seat, rear seat and seat backrest may fold forwards, even while the vehicle is in motion.
As a result, the vehicle occupant will be pressed into the seat belt with increased force. The seat belt will not be able to protect as intended and could cause additional injury.
Objects or loads in the boot or load compartment cannot be restrained by the seat backrest.
Make sure that the rear bench seat, the rear seat and the seat backrest are engaged before every trip.
If the seat backrests are not engaged and locked in place, the lock verification indicator will be red.
Requirements:
To fold the centre seat backrest forwards: the centre seat backrest has been unlocked.
You can fold the centre and outer seat backrests forwards separately.
Vehicles with a memory function: if necessary, when the seat backrest in the rear is folded forward, the front seat will move forwards slightly to avoid a collision.
If necessary, fully insert the rear seat backrest head restraints.
The release handles are located beneath the rear shelf.
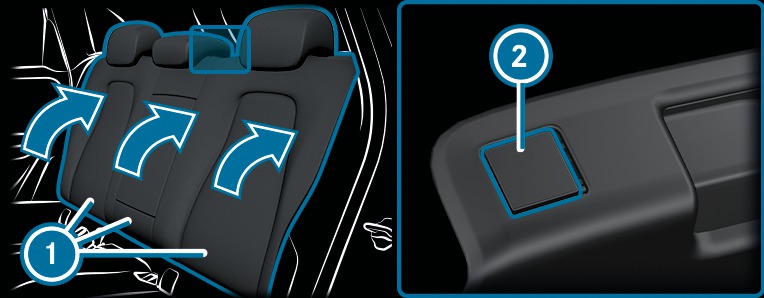
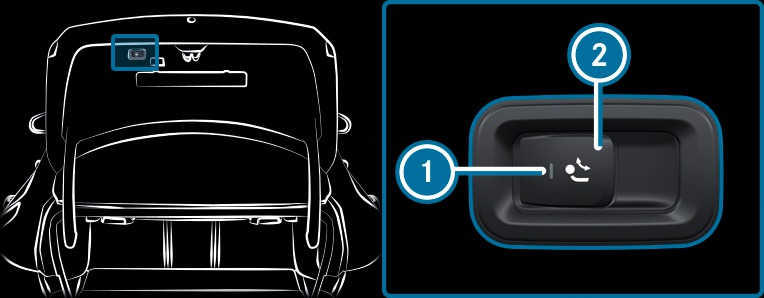
To fold the left and right seat backrests forward:
pull the right or left release handle and fold the corresponding seat backrest forwards. 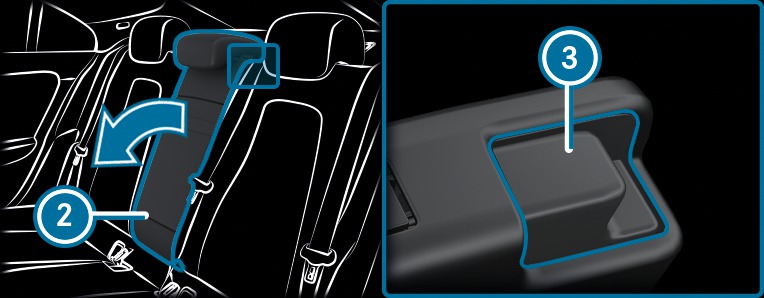
Folding the centre seat backrest forwards:
pull release catch  of seat backrest
  forwards.
 Fold the seat backrest forwards.
forwards. If necessary, reset the driver's or front passenger seat.
Folding back the rear seat backrest
WARNING Risk of becoming trapped when adjusting the seats
When you adjust a seat, you may trap yourself or a vehicle occupant.
When adjusting a seat, make sure that no one has any body parts in the sweep of the seat.
WARNING Risk of accident if the rear bench seat, rear seat and seat backrest are not engaged
The rear bench seat, rear seat and seat backrest may fold forwards, even while the vehicle is in motion.
As a result, the vehicle occupant will be pressed into the seat belt with increased force. The seat belt will not be able to protect as intended and could cause additional injury.
Objects or loads in the boot or load compartment cannot be restrained by the seat backrest.
Make sure that the rear bench seat, the rear seat and the seat backrest are engaged before every trip.
NOTE Damage caused by trapping the seat belt when folding back the seat backrest
The seat belt could become trapped and thus be damaged when the seat backrest is folded back.
Make sure that the seat belt is not trapped when folding back the seat backrest.
Move the driver's or front passenger seat forwards, if necessary.
Fold the corresponding seat backrest back until it engages.
back until it engages. Left and right seat backrests: if the seat backrest is not engaged and locked, this will be shown on the multifunction display on the instrument cluster.
Centre seat backrest: if the seat backrest is not engaged and locked, red lock verification indicator will be visible.
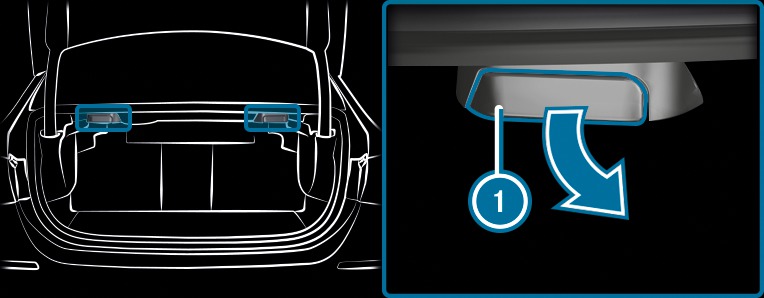
Opening and closing the stowage space under the boot floor
To open:
lift the boot floor at recess and swing it upwards. To close:
fold the boot floor downwards. Folding the ball neck out or in
WARNING Risk of accident due to the ball neck not being engaged
If the ball neck is not engaged, the trailer may come loose.
Always engage the ball neck as described.
WARNING Risk of injury from ball neck swinging outwards
The ball neck may swing outwards when unlocking or when it has not been properly engaged.
There is a risk of injury within the ball neck's range of movement!
Unlock the ball neck only when its range of movement is unobstructed.
Always be sure the ball neck is engaged when folding inwards.
Requirements:
The vehicle is secured against rolling away.
The swivel range is clear.
The trailer cables or adapter plugs have been removed.
Folding the ball neck out
Pull release switch until the ball neck unlocks.
until the ball neck unlocks. The ball neck will fold out from under the rear bumper.
Indicator lamp will flash.
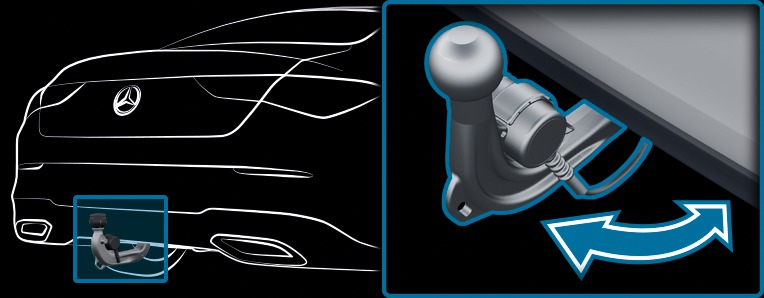
Pull the ball neck in the direction of the arrow until it engages audibly in a vertical position.
Indicator lamp on the ball neck release switch will go out.
If the ball neck is not securely locked in place, the Trailer coupling Check lock message will appear on the multifunction display.
Remove the cover cap from the ball head and store it in a safe place.
Make sure that the ball on the ball neck is clean. Check that it is either greased or dry (grease-free), depending on the instructions for the trailer.
Folding the ball neck in
Pull release switch until the ball neck unlocks.
until the ball neck unlocks. The ball neck will fold up under the rear bumper.
Indicator lamp will flash.
Push the ball neck in the direction of the arrow until it engages audibly behind the bumper.
Indicator lamp will go out and the message on the multifunction display will disappear.
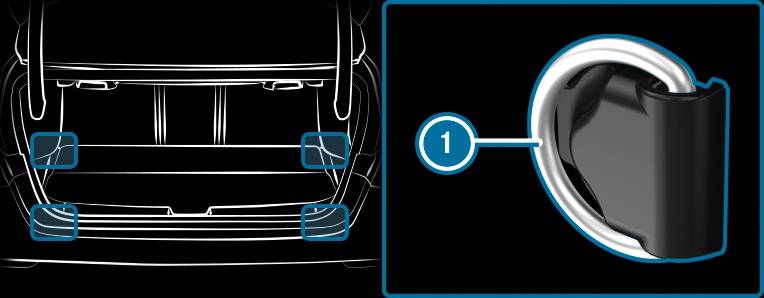
Overview of the tie-down eyes
Observe the notes on loading the vehicle More.
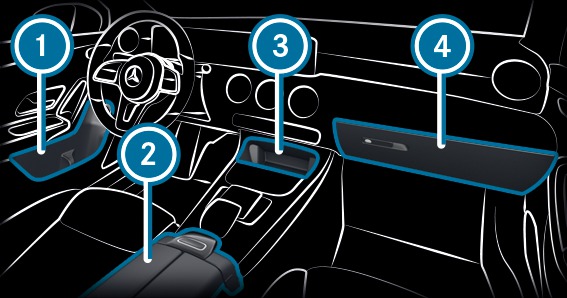
Overview of the front stowage compartments
WARNING Risk of injury due to objects being stowed incorrectly
If objects in the vehicle interior are stowed incorrectly, they can slide or be thrown around and hit vehicle occupants. In addition, cup holders, open stowage spaces and mobile phone receptacles cannot always retain all objects within.
There is a risk of injury, particularly in the event of sudden braking or a sudden change in direction.
Always stow objects so that they cannot be thrown around in such situations.
Always make sure that objects do not protrude from stowage spaces, luggage nets or stowage nets.
Close the lockable stowage spaces before starting a journey.
Always stow and secure heavy, hard, pointed, sharp-edged, fragile or bulky objects in the boot/load compartment.
Observe the notes on loading the vehicle.

Locking/unlocking the glove compartment
WARNING Risk of injury due to objects being stowed incorrectly
If objects in the vehicle interior are stowed incorrectly, they can slide or be thrown around and hit vehicle occupants. In addition, cup holders, open stowage spaces and mobile phone brackets cannot always retain all objects they contain.
There is a risk of injury, particularly in the event of sudden braking or a sudden change in direction.
Always stow objects in such a way that they cannot be thrown around in such situations.
Always make sure that objects do not protrude from stowage spaces, luggage nets or stowage nets.
Close the lockable stowage spaces before starting a journey.
Always stow and secure heavy, hard, pointed, sharp-edged, fragile or bulky objects in the boot.
Observe the notes on loading the vehicle.

Turn the emergency key a quarter turn clockwise  (to lock) or anti-clockwise
  (to unlock).
(to lock) or anti-clockwise (to unlock).