- smart fortwo
- EQ fortwo
- 04/2021
Adapting the low beam to driving on the left or right
The symmetrical low beam is needed in countries that drive on the other side of the road from the country of registration. Unlike the asymmetrical low beam, it does not dazzle oncoming traffic. The symmetrical low beam does not light up as much of the edge of the carriageway.

Open the service flap.
For symmetrical low beam:
turn the screws in both headlamps as far as they will go towards  .
. For asymmetrical low beam:
turn the screws in both headlamps as far as they will go towards  .
. Have the setting of the low beam checked at a qualified specialist workshop.
Notes on regularly inspecting wheels and tyres
WARNING Risk of accident due to a flat tyre
A flat tyre severely affects the driving characteristics as well as the steering and braking of the vehicle.
Tyres without run-flat characteristics:
Do not drive with a flat tyre.
Change the flat tyre immediately with an emergency spare wheel or spare wheel. Alternatively, consult a qualified specialist workshop.
Tyres with run-flat characteristics:
Observe the information and warning notes on MOExtended tyres (run-flat tyres).
WARNING Risk of injury due to damaged tyres
Damaged tyres can cause tyre pressure loss.
Check the tyres regularly for signs of damage and replace any damaged tyres immediately.
WARNING Risk of aquaplaning due to insufficient tyre tread
Insufficient tyre tread will result in reduced tyre grip.
The risk of aquaplaning is increased on wet roads, especially when the speed of the vehicle is not adapted to suit the conditions.
Thus, you should regularly check the tread depth and the condition of the tread across the entire width of all tyres.
Minimum tread depth for:
Summer tyres: 3 mm
M+S tyres: 4 mm
For safety reasons, replace the tyres before the legally-prescribed limit for the minimum tread depth is reached.
If you cannot avoid driving over obstacles, e.g. kerbs, do so slowly and at an obtuse angle only. The wheel rims and tyres could otherwise be damaged.
Carry out the following checks regularly on all wheels, at least once a month or as required, e.g. prior to long journeys:
Check the tyre pressure More.
Visually inspect wheels and tyres for damage.
Check the valve caps.
The valves must be protected against moisture and dirt with the valve caps specially approved for the vehicle.
Visually check the tyre tread depth and the tyre tread over the entire width.
The minimum tyre tread depth for summer tyres is 3 mm and for winter tyres 4 mm.
NOTE Damage to the vehicle due to driving too fast and due to impacts to the vehicle underbody and suspension components
In the following situations, in particular, there is a risk of damage to the vehicle:
the vehicle becomes grounded, e.g. on a high kerb or an unpaved road
the vehicle is driven too fast over an obstacle, e.g. a kerb, speed bump or pothole
a heavy object strikes the underbody or suspension components
In situations such as these, damage to the body, underbody, suspension components, wheels or tyres and high-voltage battery components may not be visible. Components damaged in this way can unexpectedly fail or, in the case of an accident, may no longer absorb the resulting force as intended.
Have the vehicle checked and repaired immediately at a qualified specialist workshop.
or
If driving safety is impaired while continuing your journey, pull over and stop the vehicle immediately, while paying attention to road and traffic conditions, and contact a qualified specialist workshop.
Modification work on the brake system and wheels is not permitted. The use of spacers or brake dust shields is not permitted. This will invalidate the general operating permit for the vehicle.
Check the wheels and tyres for damage at least once a month, as well as after driving off-road or on poorly surfaced roads.
Run in new tyres at moderate speeds for the first 100 km. The tyres only attain their maximum performance after this distance.
Using a safety vest


The safety vest only meets the requirements defined by the legal standard if it is the correct size and fully closed when in use.
The safety vest must be replaced in the following cases:
it is damaged or dirt on the reflective strips can no longer be removed
if you exceed the maximum number of washes
if the fluorescence has faded
The safety vest is located in door stowage compartment of the front passenger door.

To remove:
take out the safety vest bag containing the safety vest. Open the safety vest bag and take out the safety vest.
To stow:
fold the safety vest, roll it up and stow it in the safety vest bag. Stow the safety vest bag in door stowage compartment .
. Removing the warning triangle

Warning triangle is secured behind the driver's seat backrest with a Velcro fastener. Return it to this location after use.
Switch on the hazard warning lamps.
Observe the notes on securing the vehicle in the event of an accident or breakdown More.
Fold the driver's seat forwards.
Remove warning triangle .
. After use, place the warning triangle back in the backrest of the driver's seat.
Removing the first-aid kit
Check the expiry date on the first-aid kit at least once a year. Replace the contents if necessary, and replace any missing parts.
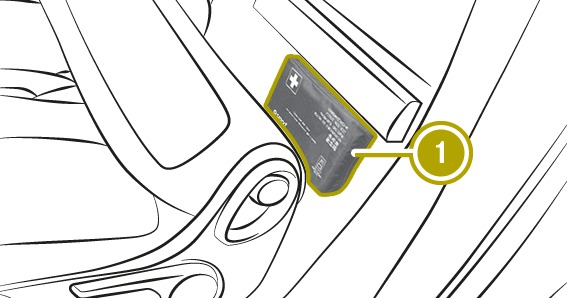
First-aid kit (soft-sided) is secured behind the driver's seat backrest with a Velcro fastener. Return the first-aid kit (soft sided) to this location after use.
Fold the driver's seat forwards.
Remove first-aid kit .
.