Starting an automatic filling station search
Requirements:
The automatic filling station search is activated
 More.
More.
Driving situation
Route guidance is active. The fuel level in the fuel tank reaches the reserve fuel level.
The Fuel tank reserve level Do you want to start the search for filling stations? message is shown.
Select Yes.
The automatic filling station search begins. The available filling stations along the route or in the vicinity of the vehicle's current position are displayed.
Select the filling station.
The address of the filling station is displayed.
If route guidance is not active, select Start route guidance.
The selected filling station is set as the destination. Route guidance begins.
or
If route guidance is active, select Start new route guidance or Set as next intermediate destination.
Start new route guidance: the selected filling station is set as a new destination. The previous destinations and intermediate destinations are deleted. Route guidance to the filling station begins.
Set as next intermediate destination: the selected filling station is set as the next intermediate destination. Route guidance begins.
If there are already four intermediate destinations:
select Yes in the prompt. The selected filling station is entered into position 1 of the intermediate destinations menu. Intermediate destination 4 is deleted. Route guidance begins.
Refuelling the vehicle
WARNING Risk of fire or explosion from fuel
Fuels are highly flammable.
Fire, naked flames, smoking and creation of sparks must be avoided.
Switch off the ignition and, if available, the stationary heater, before and while refuelling the vehicle.
WARNING Risk of injury from fuels
Fuels are poisonous and hazardous to your health.
Do not swallow fuel or let it come into contact with skin, eyes or clothing.
Do not inhale fuel vapour.
Keep children away from fuel.
Keep doors and windows closed during the refuelling process.
If you or other people come into contact with fuel, observe the following:
Immediately rinse fuel off your skin with soap and water.
If fuel comes into contact with your eyes, immediately rinse them thoroughly with clean water. Seek medical attention immediately.
If you swallow fuel, seek medical attention immediately. Do not induce vomiting.
Change immediately out of clothing that has come into contact with fuel.
WARNING Risk of fire and explosion due to electrostatic charge
Electrostatic charge can create sparks and thereby ignite fuel vapours.
Before you open the fuel filler cap or take hold of the pump nozzle, touch the metallic vehicle body.
This discharges any electrostatic charge that may have built up.
Do not get into the vehicle again during the refuelling process.
Otherwise, electrostatic charge can build up again.
NOTE Damage caused by the wrong fuel
Vehicles with a petrol engine:
Even small amounts of the wrong fuel could result in damage to the fuel system, the engine and the emission control system.
Only refuel using unleaded, sulphur-free fuel that conforms to European EN 228, or an equivalent specification.
The RON requirement is located in the fuel filler flap.
Fuel of this specification may contain up to 10% ethanol. Your vehicle is suitable for use with E10 fuel.
Never refuel using any of the following fuels:
diesel
regular petrol with an octane number lower than 91 RON
petrol with more than 10% ethanol by volume, e.g. E15, E30, E85, E100
petrol with more than 3% methanol by volume, e.g. M15, M30
petrol with additives containing metal
If you accidentally refuel with the wrong fuel:
Do not switch the ignition on.
Consult a qualified specialist workshop.
NOTE Do not use diesel to refuel vehicles with a petrol engine
If you have accidentally refuelled with the wrong fuel:
do not switch the ignition on. Otherwise fuel can enter the engine.
Even small amounts of the wrong fuel could result in damage to the fuel system and the engine. The repair costs are high.
Consult a qualified specialist workshop.
Have the fuel tank and fuel lines drained completely.
NOTE Damage to the fuel system caused by overfilled fuel tanks
Only fill the fuel tank until the pump nozzle switches off.
NOTE Fuel may spray out when you remove the fuel pump nozzle
Only fill the fuel tank until the pump nozzle switches off.
Requirements:
The vehicle is unlocked More.
Do not get into the vehicle again during the refuelling process. Otherwise, electrostatic charge could build up again.
Observe the notes on operating fluids More.
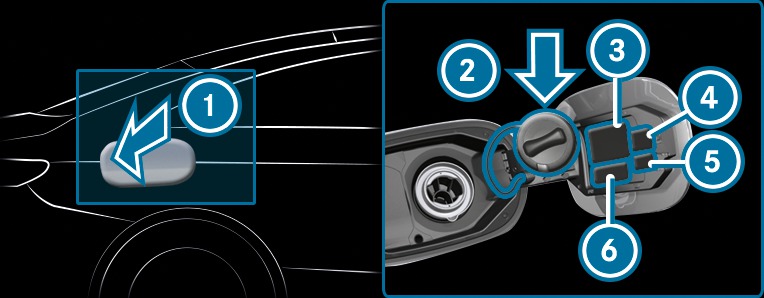


Press on the back area of fuel filler flap .
. Turn the fuel filler cap anti-clockwise and remove it.
Insert the fuel filler cap from above into bracket .
. Completely insert the pump nozzle into the tank filler neck, hook in place and refuel.
Only fill the fuel tank until the pump nozzle switches off.
Replace the cap on the filler neck and turn clockwise until it engages audibly.
Close fuel filler flap .
. Close the fuel filler flap before locking the vehicle.
Resetting values on the Trip menu of the on-board computer
The spelling on the main menu displayed may differ. Therefore, observe the menu overview for the instrument display MoreMore.
You can reset the values of the following functions:
Trip distance
Trip computer "From start" and "From reset"
ECO display
To select the function to be reset:
swipe upwards or downwards on the left-hand Touch Control. Press the left-hand Touch Control.
Select Yes.
Press the left-hand Touch Control.
If you press and hold the left-hand Touch Control, the function will be reset immediately.
Topping up the windscreen washer system
WARNING Risk of burns from hot component parts in the engine compartment
Certain components in the engine compartment can be very hot, e.g. the engine, the radiator and parts of the exhaust system.
Allow the engine to cool down and only touch component parts described in the following.
WARNING Danger of burns when opening the bonnet
If you open the engine bonnet when the engine has overheated or during a fire in the engine compartment, you could come into contact with hot gases or other escaping operating fluids.
Before opening the bonnet, allow the engine to cool down.
In the event of a fire in the engine compartment, keep the engine bonnet closed and call the fire service.
WARNING ‑ Risk of fire and injury due to windscreen washer concentrate
Windscreen washer concentrate is highly flammable. It could ignite if it comes into contact with hot engine component parts or the exhaust system.
Make sure that no windscreen washer concentrate spills out next to the filler opening.
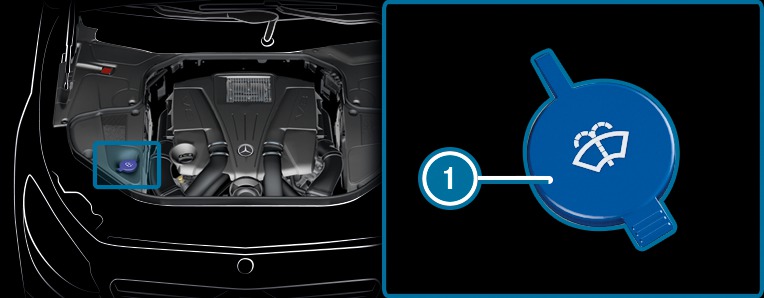
Remove cap by the tab, place on the edge of the filler opening and engage in place.
by the tab, place on the edge of the filler opening and engage in place. Top up the washer fluid.
Replacing the windscreen wiper blades (MAGIC VISION CONTROL)
WARNING Risk of becoming trapped if the windscreen wipers are switched on while wiper blades are being replaced
If the windscreen wipers begin to move while you are changing the wiper blades, you can be trapped by the wiper arm.
Always switch off the windscreen wipers and ignition before changing the wiper blades.
Moving the wiper arms to the replacement position
If the ignition has been switched off, switch it on first of all.
Switch off the ignition.
Within around 15 seconds, press and hold the  button for approximately 3 secondsMore.
button for approximately 3 secondsMore. The wiper arms will move into the replacement position.
Removing the wiper blades
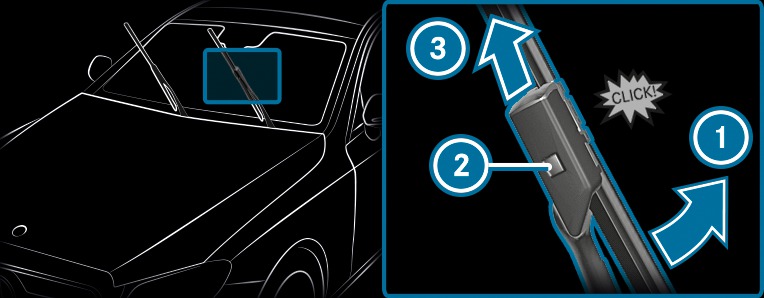
To bring the wiper blade into position to be removed:
hold the wiper arm firmly in one hand. With the other hand, turn the wiper blade in the direction of arrow beyond the point of resistance. The wiper blade will engage in the removal position with a click.
To remove the wiper blade:
press release button , pull the wiper blade in the direction of arrow and remove. Fitting the wiper blades
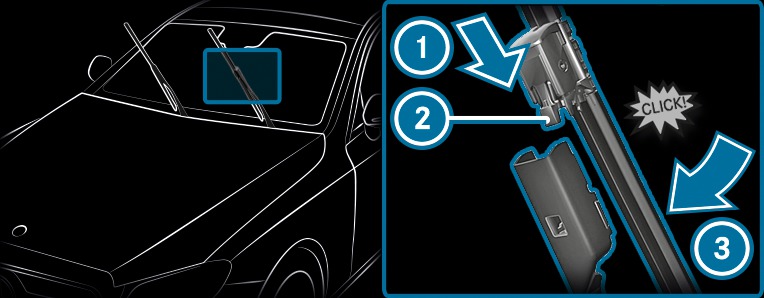
Push the new wiper blade onto the wiper arm in the direction of arrow until release button engages.
until release button engages. Push the wiper blade beyond the point of resistance in the direction of arrow on the wiper arm.
on the wiper arm. The wiper blade will engage with a noticeable click and move freely again.
Fold the wiper arm back onto the windscreen.
Switch on the ignition.
Press the button on the combination switch More.
button on the combination switch More. The wiper arms will move into the original position.
Switch off the ignition.
Checking the engine oil level using the on-board computer
Requirements:
The engine has warmed up.
The vehicle is parked on a level surface.
The engine is running at idle speed.
The engine oil level is determined during driving. Determining the engine oil level can take up to 30 minutes with a normal driving style and even longer with an active driving style.
You will see one of the following messages on the multifunction display:
Engine oil level Measuring now: measurement of the oil level is not yet possible.
Repeat the request after a maximum of 30 minutes driving.
Engine oil level OK and the bar display for indicating the oil level on the multifunction display is green and is between "min" and "max": the oil level is correct.
Engine oil level Add 1.0 l and the bar display for indicating the oil level on the multifunction display is orange and is below "min":
Add 1 l of engine oil.
Reduce engine oil level and the bar display for indicating the oil level on the multifunction display is orange and is above "max":
Drain off any excess engine oil that has been added. To do so, consult a qualified specialist workshop.
For engine oil level turn on ignition:
Switch on the ignition to check the engine oil level.
Engine oil level System inoperative: sensor faulty or not inserted.
Consult a qualified specialist workshop.
Engine oil level System currently unavail.:
Close the bonnet.
Information on washing the vehicle in a car wash
WARNING Risk of an accident due to reduced braking power after washing the vehicle
Braking efficiency is reduced after washing the vehicle.
After the vehicle has been washed, brake carefully while paying attention to the traffic conditions until braking power has been fully restored.
NOTE Damage due to unsuitable car wash
Before driving into a car wash make sure that the car wash is suitable for the vehicle dimensions.
Ensure there is sufficient ground clearance between the underbody and the guide rails of the car wash.
Ensure that the clearance width of the car wash, in particular the width of the guide rails, is sufficient.
To avoid damage to your vehicle when using a car wash, ensure the following beforehand:
to avoid possible water ingress in the vehicle, it is preferable to use car washes which allow the high-pressure pre-cleaning to be deactivated (specification for the cabriolet program).
it is imperative to avoid a subsequent hot-wax treatment.
remove the key in order to ensure that the wind deflector on the windscreen retracts.
Active Distance Assist DISTRONIC and the HOLD function are deactivated.
the 360° Camera or the reversing camera is switched off.
the side windows and soft top are closed completely.
the blower for the ventilation/heating is switched off.
the windscreen wiper switch is in position
 .
. the key is at a minimum distance of 3 m away from the vehicle, otherwise the boot lid could open unintentionally.
in car washes with a conveyor system: neutral
 is engaged.
In car washes with a conveyor system: if you would like to leave the vehicle while it is being washed, make sure the key is located in the vehicle. The park position  is otherwise automatically engaged.
If, after the car wash, you remove the wax from the windscreen and wiper rubbers, this will prevent smearing and reduce wiper noise.