- smart forfour
- EQ forfour
- 10/2019
Adapting the low beam to driving on the left or right
The symmetrical low beam is needed in countries that drive on the other side of the road from the country of registration. Unlike the asymmetrical low beam, it does not dazzle oncoming traffic. The symmetrical low beam does not light up as much of the edge of the carriageway.
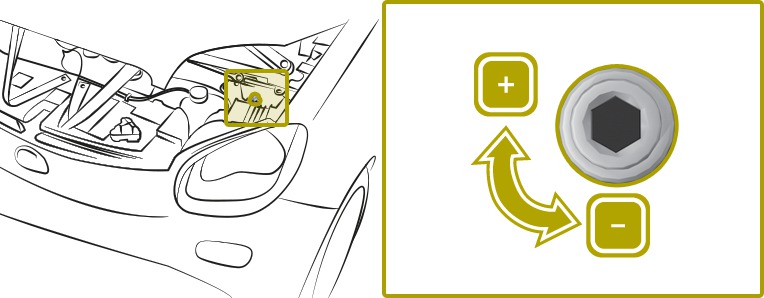
Open the service flap.
For symmetrical low beam:
turn the screws in both headlamps as far as they will go towards  .
. For asymmetrical low beam:
turn the screws in both headlamps as far as they will go towards  .
. Have the setting of the low beam checked at a qualified specialist workshop.
Notes on regularly inspecting wheels and tyres
WARNING Risk of accident due to a flat tyre
A flat tyre severely affects the driving characteristics as well as the steering and braking of the vehicle.
Tyres without run-flat characteristics:
Do not drive on with a flat tyre.
Change the flat tyre immediately with an emergency spare wheel or spare wheel. Alternatively, consult a qualified specialist workshop.
Tyres with run-flat characteristics:
Observe the information and warning notes on MOExtended tyres (run-flat tyres).
WARNING Risk of accident from damaged tyres
Damaged tyres can cause tyre pressure loss.
As a result, you could lose control of your vehicle.
Check the tyres regularly for signs of damage and replace any damaged tyres immediately.
WARNING Risk of aquaplaning due to insufficient tyre tread
Insufficient tyre tread will result in reduced tyre grip. The tyre tread is no longer able to dissipate water.
This means that in heavy rain or slush the risk of aquaplaning is increased, in particular where speed is not adapted to suit the conditions.
If the tyre pressure is too high or too low, tyres may exhibit different levels of wear at different locations on the tyre tread.
Thus, you should regularly check the tread depth and the condition of the tread across the entire width of all tyres.
Minimum tread depth for:
Summer tyres: 3 mm
M+S tyres: 4 mm
For safety reasons, replace the tyres before the legally prescribed limit for the minimum tread depth is reached.
If you cannot avoid driving over obstacles, e.g. kerbs, do so slowly and at an obtuse angle only. The wheel rims and tyres could otherwise be damaged.
Carry out the following checks regularly on all wheels, at least once a month or as required, e.g. prior to long journeys:
Check the tyre pressure More
Visually check the wheels and tyres for damage
Check the valve caps
The valves must be protected against moisture and dirt with the valve caps specially approved for the vehicle.
Visually check the tyre tread depth and the tyre tread over the entire width.
The minimum tyre tread depth for summer tyres is 3 mm and for winter tyres 4 mm.
NOTE Damage to the vehicle
In the following situations, in particular, there is a risk of damage to the vehicle:
the vehicle bottoms out, e.g. on a high kerb or an unpaved road
the vehicle is driven too fast over an obstacle, e.g. a kerb, speed bump or pothole
a heavy object strikes the underbody or chassis components
In such or similar cases, the body, underbody, chassis parts, wheels or tyres, or parts of the high-voltage battery could be damaged, even if the damage is not visible. Components damaged in this way may unexpectedly fail or no longer be able to withstand the loads they are subjected to in an accident as intended.
Have the vehicle checked and repaired immediately at a qualified specialist workshop.
or
If driving safety is impaired while continuing your journey, pull over and stop the vehicle immediately in accordance with the traffic conditions, and contact a qualified specialist workshop.
Modification work on the brake system and wheels is not permitted. The use of spacers or brake dust shields is not permitted. This will invalidate the general operating permit for the vehicle.
Check the wheels and tyres for damage at least once a month, as well as after driving off-road or on poorly surfaced roads.
Run in new tyres at moderate speeds for the first 100 km. The tyres only attain their maximum performance after this distance.
Using a safety vest


The safety vest only meets the requirements defined by the legal standard if it is the correct size and fully closed when in use.
The safety vest must be replaced in the following cases:
it is damaged or dirt on the reflective strips can no longer be removed
if you exceed the maximum number of washes
if the fluorescence has faded
The safety vest is located in door stowage compartment of the front passenger door. Safety vests can also be stored in the rear door stowage compartments.

To remove:
take out the safety vest bag containing the safety vest. Open the safety vest bag and take out the safety vest.
To stow:
fold the safety vest, roll it up and stow it in the safety vest bag. Stow the safety vest bag in door stowage compartment .
. Removing the warning triangle

Warning triangle is located next to first-aid kit in the boot behind the seat backrest, secured to the carpet with a Velcro fastener. Return it to this location after use.
Remove warning triangle from the boot.
from the boot. Removing the first-aid kit
Check the expiry date on the first-aid kit at least once a year. Replace the contents if necessary, and replace any missing parts.
First-aid kit is located next to warning triangle in the boot behind the seat backrest, secured to the carpet with a Velcro fastener. Return it to this location after use.
Remove first-aid kit from the boot.
from the boot. Operating the navigation system
Selecting the navigation system
Select Menu > Navigation.
The following navigation settings can be selected:
Finding the destination
Planning trip routes
Displaying a map
Calling up TomTom services
Making navigation system settings
Importing map data
DANGER Risk of fatal injury from swallowing SD cards
SD cards are small parts.
They could be swallowed and lead to choking.
Keep SD cards out of the reach of children.
Seek medical attention immediately if an SD card has been swallowed.
NOTE Damage from manual changes
Manual changes can damage the SD card.
Do not change or manipulate the contents of the SD card manually.
This excludes map updates.
Insert the SD card into the SD card slot in the centre console.
Switch on the device.
The map data is imported by the navigation system.
Removing an SD card
Select Menu > System > Remove SD-card.
Confirm the display message with Yes.
Press the SD card.
Remove the SD card from the slot.
Updating the map data
Updates are offered at regular intervals for the map data. The first update can be downloaded free-of-charge from the web portal within the first 90 days after activation of the vehicle. Registration at https://www.tomtom.com/forsmart is required. Further information may be obtained in any smart centre.
Remove the SD card from the vehicle and insert it into a computer.
Install the update software on a computer.
The assistant for the map update starts.
Apart from updates, you can also download the current software for the media system and Premium Voices can be purchased from TomTom.
Modifying a route
Useful information
Once a destination is selected the navigation system calculates the route to the destination. The following options are available for modifying route guidance:
Calculating alternative routes
Modifying routes calculated by the navigation system
Planning routes in advance and routing via specific way points.
Modifying settings for calculating routes.
Once a route is calculated, a route summary is shown. As standard, the fastest route, taking IQ Routes™ into consideration, is calculated for route planning. Traffic information is taken into account when calculating the route.
Depending on the remaining range, the sections of route are coloured as follows:
Green: remaining range should be sufficient for this route section.
Orange: depending on driving style and external influencing factors this route section can be achieved.
Red: remaining range should not be sufficient for this route section.
With the "Route overview" function, you can set whether the summary display of a calculated route is hidden automatically after ten seconds.
If the route is not confirmed with Done, the view changes automatically to the map view after about ten seconds.
Showing the planned route
Having a route calculated
Enter the destination.
Select Done.
The route is displayed. If the remaining range is not expected to be sufficient for the destination, a prompt appears asking if a charging station should be added to the route.
Showing details for the route
Select  > Route details.
> Route details. The following settings can be selected:
Show instructions
An overview of the route with the instructions for navigation manoeuvres appears.
Show route map
The route appears on a map.
Show destination
The route destination appears.
Using
you can find a car park near the destination or add the position to the saved locations. Show traffic info on the route
The traffic disruptions on the route appear.
Summary
A summary of the route details appears.
Saving a planned route
Select > Save trip route.
> Save trip route. Changing the route
Cancelling a route
Select Navigation > Change route > Cancel route.
When a new destination is entered, route guidance can resume again.
Calculating alternatives
Select Navigation > Change route > Calculate alternative.
A route via other roads is calculated and shown.
Select an alternative route or the previous route.
Guiding a route via way points
The course of the route can be adjusted by entering up to four way points.
Select Navigation > Change route > Travel via.
A list of saved way points will be shown if way points have already been entered.
Select Add.
Select the new way point from Address, Recent destinations, Saved locations, TomTom Places or Point of interest.
The new way point is added.
Avoiding blocked roads
The route can be modified if part of a road is blocked on the route or if there is a traffic jam.
Select Navigation > Change route > Avoid roadblock.
Select the length of the route which should detour should avoid.
Avoid specific roads
The route will be taken so that specific roads are bypassed.
Select Navigation > Change route > Avoid part of route.
A list of the roads on the route is shown.
Select the street to be avoided.
Making allowances for traffic disruptions
The route is recalculated on the basis of the current traffic information.
Traffic information is not available in all countries or regions.
Select Navigation > Change route > Minimise delays.
An overview of the traffic disruptions on the route is shown.
Select the traffic disruption to be detoured around.
Planning a route in advance
Adding a route
Select Navigation > Itineraries.
Select Add.
Select the starting point for the route.
Enter the route destination.
Enter at least one way point for the route.
Enter the name for the route.
Confirm with Done.
Starting navigation with a saved route
Select Navigation > Itineraries.
Select the desired route.
Select > Go.
> Go. Setting route planning
Selecting route types
Select Navigation > Settings > Route planning > Route types.
Select one of the following settings:
Ask when planning
Always plan fastest route
Always plan eco-routes
Always avoid motorways
Always plan shortest route
Selecting a setting for toll roads
Select Navigation > Settings > Route planning > Toll roads.
Select one of the following settings:
Ask about toll roads on the route
Always avoid toll roads
Never avoid toll roads
Selecting a setting for ferry connections
Select Navigation > Settings > Route planning > Ferry connections.
Select one of the following settings:
Ask about ferries on my route
Always avoid ferries
Never avoid ferries
The Eurotunnel is treated as a ferry connection for the route planning.
Selecting a setting for unpaved roads
Select Navigation > Settings > Route planning > Unpaved roads.
Select one of the following settings:
Ask about unpaved roads on my route
Always avoid unpaved roads
Selecting a setting for carpool lanes
Carpool lanes are lanes which may only be used by vehicles with at least two vehicle occupants.
Select Navigation > Settings > Route planning > Carpool lane settings.
Select one of the following settings:
Ask about carpool lanes on my route
Always avoid carpool lanes
Never avoid carpool lanes
Starting the automatic station search function
Select  or
or  in "Frequency" display mode.
or in "Frequency" display mode.